Web HostingBudget-friendly shared hosting plans
 Domains SearchFrom .com to unique country domains, explore and register extensions worldwide.
 WordPress HostingPower your blog or business with WordPress hosting.
 Email HostingSimple, secure email hosting that helps you stay connected and professional.
 Reseller HostingStart your own hosting business with easy and reliable reseller hosting plans.
 AffiliateJoin our affiliate program and earn commissions every time you bring in new customers.
 cPanel HostingHosting powered by cPanel, the world’s most user-friendly control panel.
 Windows HostingBuilt for Windows applications and websites
 IN Domain PricesDon’t miss out on the best domain deals in India!
 WHOIS LookupFind out who owns a domain name with a quick and easy WHOIS search.
 .Com DomainGet the most trusted domain for worldwide credibility
 All TldsSearch and register domain extensions worldwide.
 VPS HostingPowerful virtual servers. Full root access. Reliable uptime.
 Managed VPS HostingNot a tech expert? Choose our fully managed VPS service.
 Dedicated ServersTake full power and total control of your own physical server.
So you’ve already understood what reseller hosting is from our reseller hosting business guide.
And now you’re wondering how to create and manage hosting packages in WHM.
You’ve probably bought your first reseller hosting package. Or you want to know how to actually create the packages before you buy one.
Creating and managing hosting packages in WHM is not as complicated as it may seem.
Once you understand what each setting does, you’ll be moving like a pro.
I’ll take you through everything you need to know to do exactly this.
What is WHM?
WHM stands for Web Host Manager. It is the control panel used by reseller hosting providers to manage multiple hosting accounts.
While your clients will use cPanel to manage their individual websites, you’ll use WHM to control the bigger picture.
This includes creating hosting packages, allocating resources, managing accounts, and setting permissions.
How to Create and Manage Hosting Packages in WHM
A package in WHM is simply a predefined set of resources and features that you assign to a client’s hosting account.
Let’s break the process down step by step.
Step 1) Create a Package
The first step is accessing the package creation section in WHM.
- Log in to your WHM dashboard using your reseller credentials.
- On the left-hand sidebar, locate the Packages section.
- Expand the Packages section then click on Add a Package.
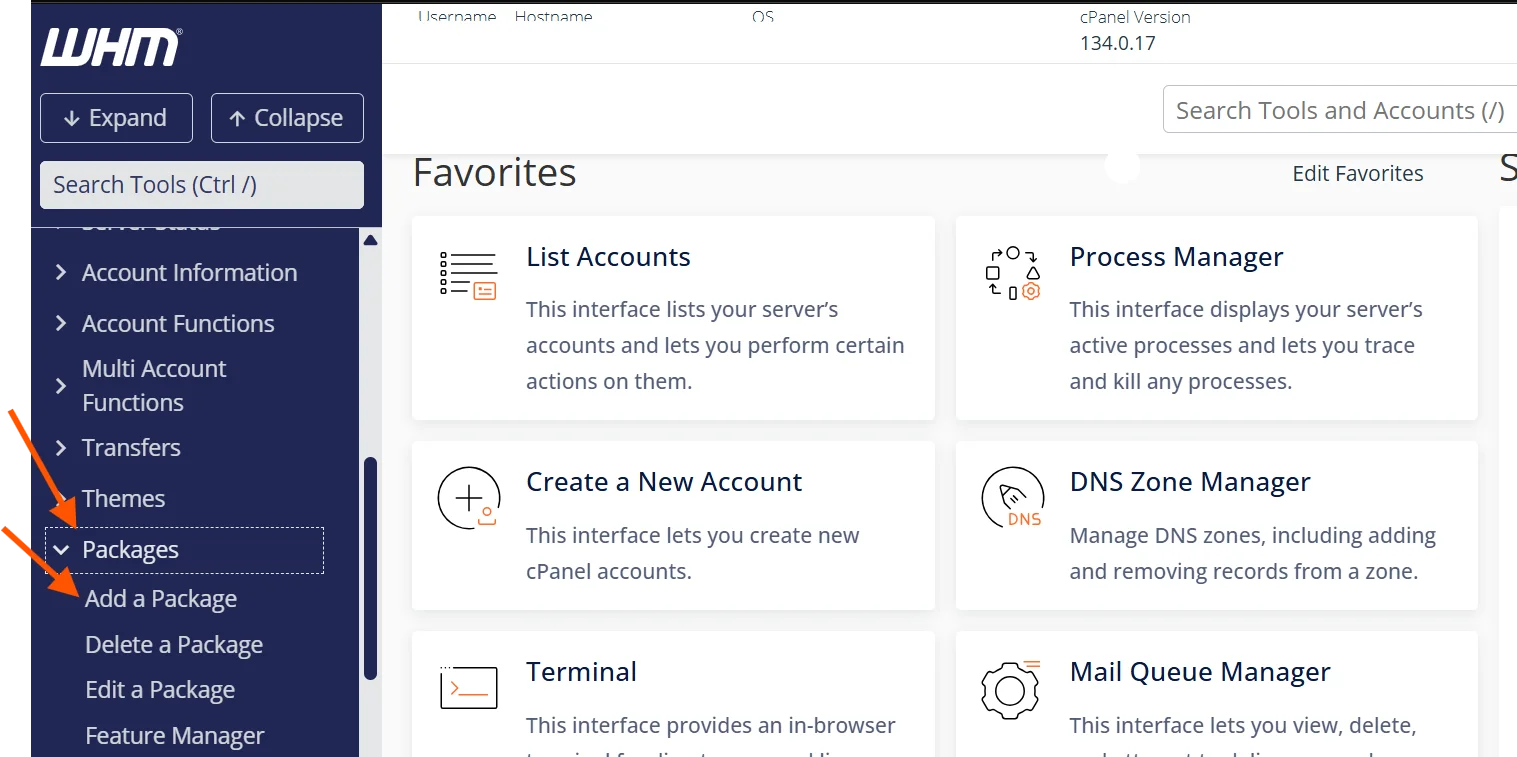
You’ll then see a form where you can define the details of your hosting package.
Step 2a) Select Package Name
The first field you’ll encounter is the Package Name.

Choose something clear and descriptive, such as:
- Basic Hosting
- Starter Plan
- Business Pro
Keep your naming simple so clients can easily understand the differences between your plans.
Step 2b) Define Your Package Resources
This is where you decide how much of each resource your client gets.

Each option has a specific meaning, and understanding them is key to building balanced packages.
- Disk Space (MB)
This determines how much storage a client has for their website files, emails, and databases. For example, a small blog might need only 1–2 GB, while a business site may need more. - Monthly Bandwidth (MB)
Bandwidth refers to the amount of data transferred between the website and its visitors. Higher traffic websites require more bandwidth. - Max FTP Accounts
This controls how many FTP users the client can create. FTP accounts are used to upload and manage website files. - Max Email Accounts
This sets the number of email addresses the client can create under their domain (e.g., [email protected]). - Max Email Lists
This allows clients to create mailing lists for newsletters or announcements. - Max Databases
Databases are essential for dynamic websites like WordPress. Most modern websites require at least one database. - Max Subdomains
Subdomains allow clients to create sections like blog.domain.com or shop.domain.com. - Max Parked Domains
Parked domains are additional domains that point to the same website. - Max Addon Domains
This determines how many separate websites a client can host under one account. - Max Hourly Email by Domain Relayed
This limits how many emails can be sent per hour, helping prevent spam and server abuse. - Max Percentage of Failed/Deferred Messages: The threshold for failed email deliveries before outgoing mail gets blocked. This protects your server’s reputation.
- Max Quota per Email Address (MB): The storage size of each individual email account. For example, if you set this to 500 MB, no single mailbox on the account can grow beyond that limit. It keeps one heavy email user from eating up all the account’s disk space.
- Max Team Users with Roles: cPanel allows account holders to create sub-users with specific permissions. For example, your client could give their developer access to files only, without handing over the full cPanel login. This setting controls how many of those sub-users each client account can have.
When setting these values, avoid going too high or too low.
If you allocate too many resources, you risk overloading your server. If you allocate too few, your plans may feel restrictive to customers.
Step 3) Configure Other Settings
Beyond resources, WHM allows you to configure additional settings that define how the hosting account behaves.

a) Options:
- Dedicated IP
A dedicated IP assigns a unique IP address to a client’s account. This is useful for advanced needs like custom SSL configurations. But most shared hosting clients do not need it. - Shell Access
Shell access allows command-line access to the server. This is powerful but can be risky if given to inexperienced users. It’s best reserved for advanced clients. - CGI Access
This allows the use of CGI scripts. Most modern websites don’t rely heavily on CGI, but enabling it ensures compatibility with older scripts. - Digest Authentication at Account Creation
This is a security feature that adds an additional authentication layer. It’s not commonly used for most clients, but can be enabled if needed.
b) cPanel Theme
This determines the interface your clients will see when they log into cPanel. It’s mostly left as Jupiter (the default).
c) Feature List
Feature lists control which tools are available in cPanel.
For example, you can enable or disable features like backups, file manager, or email tools.
Creating different feature lists for the packages allows you to further differentiate your plans.
d) Locale
This sets the default language for the client’s control panel. If you serve a specific region, you may want to customize this.
Step 4) Assigning Packages to Clients
Once your package is created, the next step is assigning it to a client.
- In WHM, go to Create a New Account.
- Enter the client’s domain name, username, and password.
- Select the package you created from the dropdown menu.
- Click Create Account.
That’s it.
The system will automatically apply all the resource limits and settings you defined in the package.
We’ll go through this in more depth in the next article.
How To Improve Your Reseller Hosting
Creating packages is just one of the steps. Running a successful reseller hosting business requires strategy.
Here’s how to stand out:
Understand Your Market
Who exactly are you selling to? Bloggers? Small businesses? Agencies? Developers?
Each group has different needs. Bloggers may want cheap, basic plans. Agencies may want high-resource plans with staging tools.
Understand your niche, and design packages that speak directly to them.
Balance Resources
Don’t just copy what competitors are doing. Build packages that offer real value without overloading your server.
Unlimited sounds attractive, but it’s rarely realistic and can tank performance for everyone else.
Offer Essential Features
The basics your clients expect include:
- Free SSL certificates
- One-click app installers (like Softaculous)
- Email hosting
- Regular backups
- 99.9%+ uptime
These shouldn’t be optional extras. They should be standard.
Transparent Pricing
Hidden fees and vague feature descriptions kill trust.
Display what’s included clearly, whether it’s storage, email, domains, or SSL. Let clients know exactly what they’re paying for.
Provide Excellent Support
This is where most small resellers fail, and where you can shine.
Respond to tickets quickly. Be friendly. Help clients even with basic questions.
Good support creates loyal customers who’ll stick with you for years and refer others.
Regularly Review and Update
Hosting is an evolving industry.
Review your packages every few months.
Are resource limits still competitive? Are features up to date? Tweak as needed to stay ahead.
Choose a Reliable Hosting Provider (if you haven’t)
If your upstream provider has slow servers, frequent downtime, or poor support, your clients will leave you. It won’t matter how well you’ve designed your packages.
That’s why your choice of reseller hosting provider matters more than anything else.
At Truehost, we understand what it takes to build a thriving reseller hosting business. We’ve helped thousands of resellers do exactly that.
Our reseller hosting plans come with:
- Free WHM and cPanel access
- Free SSL certificates for every account
- Fast NVMe SSD storage
- 99.97% uptime guarantee
- White-label branding (so your clients see your brand, not ours)
- 24/7 technical support
- Affordable pricing that leaves room for healthy profit margins
Whether you’re just starting out or scaling up, we give you the tools, infrastructure, and support to succeed.
Get Started Today
Creating and managing hosting packages in WHM might feel intimidating.
But once you understand what each resource and setting does, you can easily design packages that match exactly your clients’ needs and make a healthy profit.
But remember: your success depends on the hosting provider behind you.
If you haven’t chosen one yet, or if you’re thinking of switching to one that truly supports your reseller journey, explore our reseller hosting plans and start building.